HDR using qtpfsgui
This post is a tutorial on how to create HDR images using a software called qtpfsgui aka Luminance HDR. In case you don't know what HDR is, or are doubtful about whether HDR is for you, then refer to my previous post.
The first step of course is to ensure that you have the right software. Download and install the software from the website. (Note that since the new version (2.2) released just yesterday, this tutorial is not updated to reflect that change, and uses 2.1. However, the same techniques apply; version 2.2 is much better, and I would strongly recommend that you install that version.)
HDR is useful when the dynamic range of the scene exceeds the dynamic range of your camera. For example, consider this scene

This scene exceeds the dynamic range of my camera. The dynamic range is too vast, because there is an outer façade, an inner chamber, and a chamber within that, and the only source of illumination is the sunlight outside the cave. (For those who want to know, this image was taken at Kanheri Caves at Sanjay Gandhi National Park in Borivali.) The images as taken by my camera (at 1 stop apart) are shown below.

As I own a point and shoot Panasonic DMC-FS3, I really cannot go beyond +/- 2 EV. If I was allowed to go beyond these limits, the resulting image would have shown much greater detail.
Well, so fire up Luminance HDR, click on new HDR image,

click next

and then load the bracketed images (you can drag and drop)
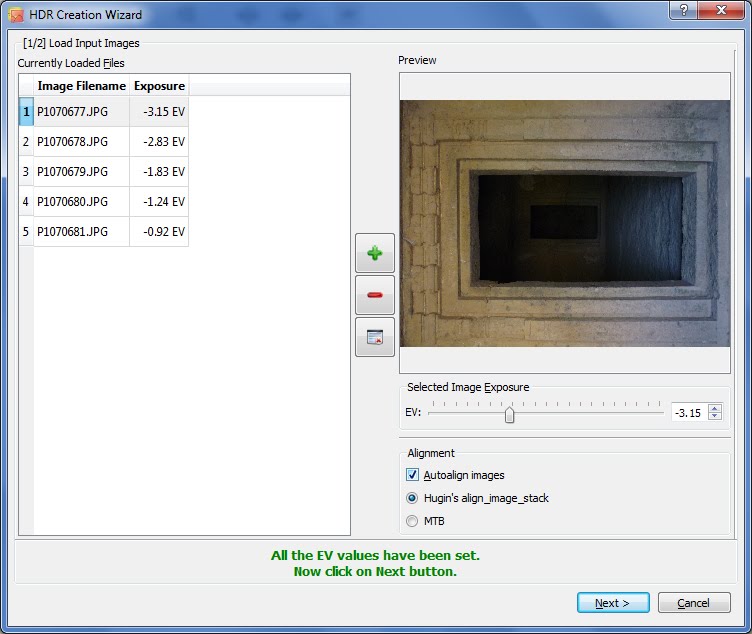
Select autoalign images, and select the method as Hugin align_image_stack (this uses the same align_image_stack mentioned in my tutorial on exposure fusion). Click next.
At this time, you better verify that the images have been aligned correctly.

If you are pleased with the alignment, click next. This brings up the HDR creation options.

Profile 1 works well enough for most cases, so leave it on profile 1. Now, click on finish, and the HDR image will be created.
Now, we arrive at the tone mapping operators. Refer to my previous post to understand tone mapping. Just to recall, tone mapping is a method of rendering the HDR image on an LDR output device. A good tone mapping operator should preserve local contrast while compressing the dynamic range.
What sets Luminance apart from proprietary software like Photomatix is that Luminance uses open algorithms and offers the user a choice. On the other hand, Photomatix probably uses a combination of these algorithms or its own proprietary algorithm for tone mapping. This means that Luminance ought to give you much more power upon how your image appears.
Typically, the outputs of Luminance HDR ought to be treated as layers, and each layer can be merged selectively to give best results using software like the GIMP. My preference for the tone mapping operators is Fattal and Drago. So, I select Fattal tone mapping operator, tweak the parameters as shown in this image

Make sure that you select the output image size as the maximum possible image size (equal to the size of the original images) before you click on tonemap. Operators like Fattal are based on image pyramids and give different outputs for different sizes of the resulting image.

At this point, the image looks over the top, though it retains local contrast rather well. We need to tone the image down, however. So, select the Drago tone mapping operator, and tone map the image once more.

You may feel that the Drago operator does not yield much detail.
Now, fire up the GIMP. Note that all exif data would probably have been wiped clean from the images by Luminance. So, open up a base image in GIMP (I generally prefer a middle exposure) and then open the resulting two images as layers (You saved them, I hope).

(Luminance 2.1 ignored the rotation information in the image, hence I had to rotate the two layers (Layer -> Transform -> Rotate 90 degree <direction>) before I could proceed, however, this is not necessary in Luminance 2.2.) With the Drago image above the Fattal image, add a layer mask to the Drago image, then use the bucket fill tool to fill it with grey colour (I used V=50)


Now, all that is required is to crop the resulting image, and we're done!

That's it. That's how you create your first HDR image. Now, for some caveats.
Remember that HDR is just a technique to expand the dynamic range of your camera. Do not use it for saturating every image. Use vibrance and tone-mapping operators in Raw Therapee for that purpose.
You are free to choose any tone-mapping operators in Luminance. Try the other 7 operators as well.
The reason I used a layer mask instead of merely changing the transparency of the Drago layer is that in case of pictures of the sky, the sky will turn an ugly grey with strong operators like Fattal. Hence, in such cases, you need to make the layer mask of the Drago layer completely white (opaque) over the sky. This is not possible just using transparency settings.
Use a tripod while shooting HDR. It will improve the results dramatically. I don't have one, but I wish I had a tripod.
In case you use a tripod, you can actually use one of the bracketed images to completely replace the sky in the tone-mapped images. The result will be much cleaner. In fact, try for a blend of exposure fusion and HDR-tonemapping techniques for best results

Kudos for you hardwork on providing tutorials using open source photography software
ReplyDeleteThanks a lot for the appreciation. I'll try my best to continue with awesome tutorials on FOSS.
Delete